The tracing guide

Get a millimeter-accurate outline from one photo.

Everything that decides whether a trace succeeds happens before you press the shutter. This guide explains how a plain sheet of paper becomes your ruler, what the camera needs from you, and how to recover when detection misses.

How a sheet of paper becomes a ruler.

A camera alone can't tell a keychain from a crowbar, because pixels carry no units. Paper fixes that. Standard sheets are cut to known dimensions within a fraction of a millimeter, so once Tracemate locates the four corners, it can undo the camera's perspective and assign a real-world length to every pixel in the frame.

01

The camera sees a trapezoid

Any handheld shot tilts the paper slightly. The four corners record exactly how.

02

Perspective is reversed

Because the true corner-to-corner distances are known, the skew can be computed and removed.

03

Pixels become millimeters

With the sheet flattened, the object outline inherits the same scale and is ready for a 42 mm grid.

A4
210 × 297 mm
A5
148 × 210 mm
US Letter
215.9 × 279.4 mm

This is why the paper matters more than your camera. A five-year-old phone produces a perfectly usable trace, as long as the sheet is flat, uncreased, and all four corners land inside the frame.

Photo checklist

Five rules for a photo that traces itself.

Detection failures almost always trace back to one of these five things. Check them before you shoot and the rest of the workflow is downhill.

  • 01

    Corners

    Do: Frame the shot so all four paper corners are visible with a little air around them.

    Avoid: A corner cropped by the frame edge or hidden under the object. One missing corner is enough to break the scale calculation.

  • 02

    Contrast

    Do: Put white paper on a dark or colored surface so its edges stand out crisply.

    Avoid: White paper on a white desk or a pale tablecloth. The edge detector can't tell where the sheet ends.

  • 03

    Lighting

    Do: Use soft, even light: a bright room, indirect daylight, or a ceiling lamp overhead.

    Avoid: Hard side light or a desk lamp at an angle. Deep shadows read as part of the object's outline.

  • 04

    Angle

    Do: Hold the phone flat, directly above the object, lens parallel to the paper.

    Avoid: A casual diagonal shot. The steeper the angle, the more the silhouette gets distorted before correction.

  • 05

    Surface finish

    Do: Matte and dark objects trace cleanest. Tools, plastic parts, and anodized metal all work well.

    Avoid: Polished chrome and glass throw reflections that look like edges. For those, let the AI Zauberstab take over.

Phone held flat and parallel above a single dark part centered on a white sheet, all four paper corners visible in the camera preview
PASSES · Lens parallel to the sheet, every corner in frame, dark part on bright paper. This photo needs zero cleanup.
Matte object resting on a white reference sheet on a contrasting workbench, evenly lit with no hard shadows around the outline
PASSES · Even light, a matte surface, and strong paper-to-bench contrast: the three ingredients of a crisp edge.

See a trace in motion.

Reading about it is one thing. Watching the outline snap onto an object is another. The whole run, photo to exported STL, takes under a minute.

Demo · photo → trace → STL, uncut

What happens between upload and STL.

Knowing how the pipeline thinks makes every correction faster. Four short dives into the parts users ask about most.

Detection

What detection actually does

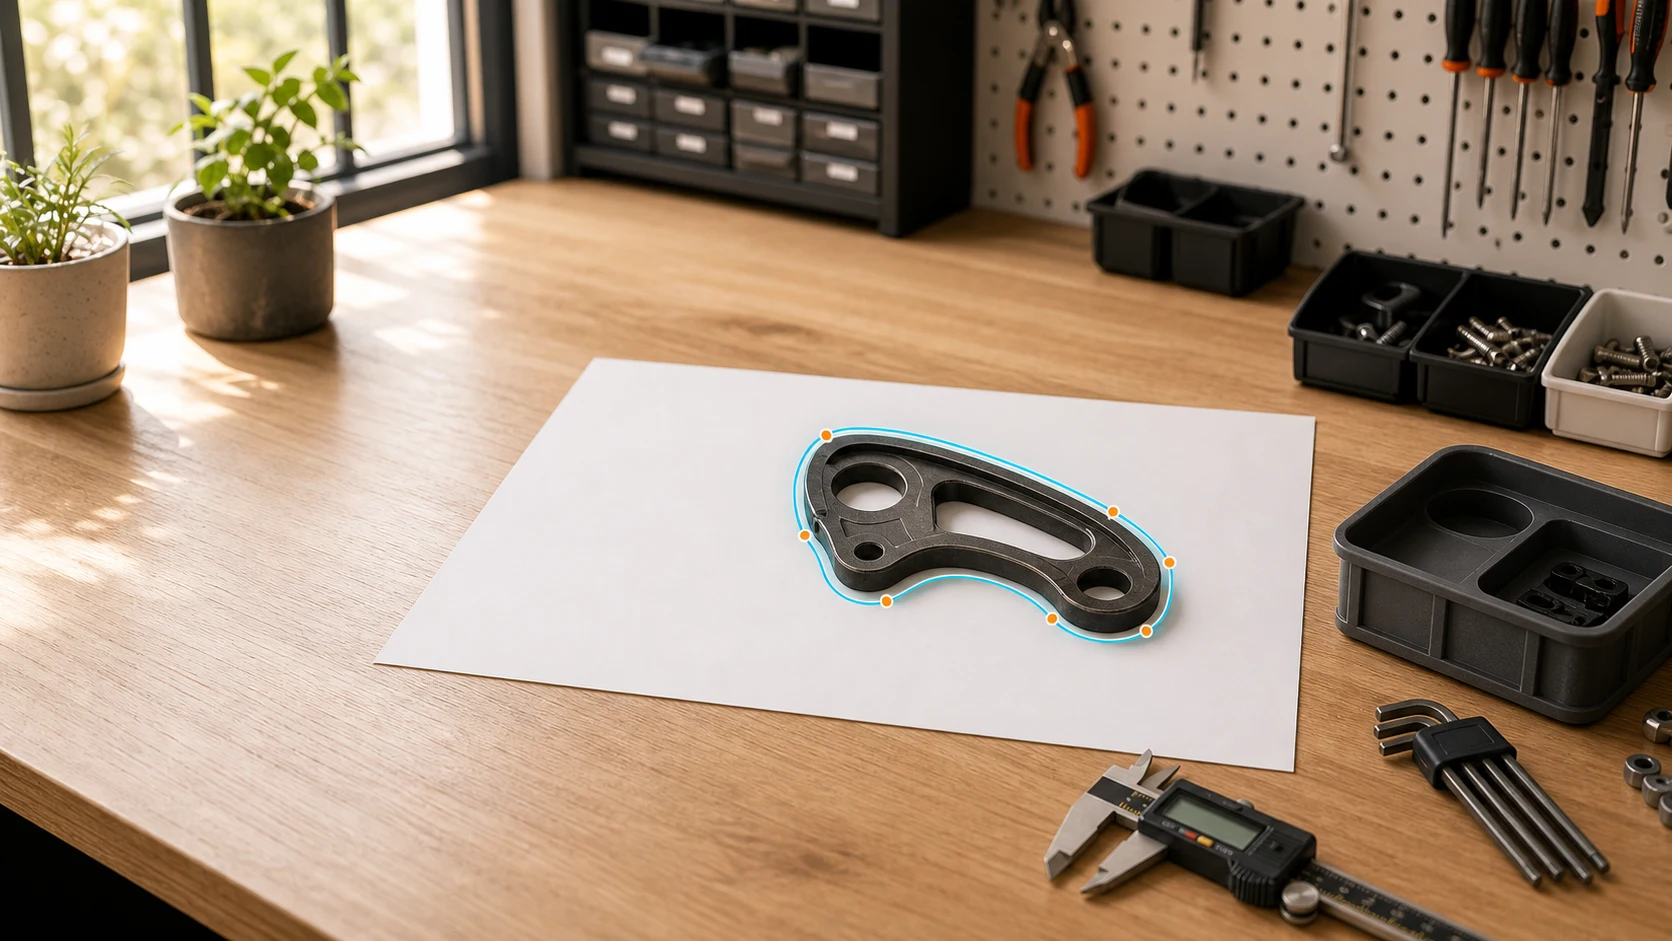
After the paper is located, Tracemate scans the area inside it for sharp brightness transitions. Connected edges are chained into closed contours, the largest contour around your object becomes the outline, and any closed contours inside it are kept as holes.

That last part matters for real tools: the hex opening of a wrench or the hanging hole of a screwdriver survives into the cutout, so the printed pocket matches the part instead of just its silhouette.

edges → contours → outline + holes

Editing

Fixing a trace by hand

No detection is perfect, and it doesn't need to be. Every outline is a set of draggable points: pull a stray point back onto the edge, delete noise, or add points where a curve needs more resolution.

If a region like black foam or a soft shadow barely registered, drop in a basic shape and merge it, or hand the photo to the AI Zauberstab and let it resolve the edges the classic detector couldn't.

drag · add · delete · merge shapes

Fit

Choosing the right clearance

Clearance is the gap between your object and the cutout wall, adjusted in 0.1 mm steps. There is no single correct value. It depends on how much grip you want. Around 0.1–0.2 mm the part presses in and stays put even when the bin is tipped; 0.3–0.4 mm gives an easy one-handed grab; 0.5 mm and up suits gloves or frequently swapped parts.

Printers vary, so treat your first export as a calibration piece: print one bin, feel the fit, and nudge the value once. After that, your number carries across projects.

snug 0.1–0.2 · grab 0.3–0.4 · loose 0.5+

Export

From outline to printable bin

The confirmed outline is extruded down into a Gridfinity body: you set how deep the pocket sinks, and the footprint snaps to whole 42 mm grid cells so it locks into any standard baseplate.

Add a finger scoop where you want to lift the part out, then export. The STL is plain geometry. Open it in PrusaSlicer, Cura, Bambu Studio, or whatever your printer speaks. No special profile required.

depth · scoop · 42 mm cells · STL

If detection fails, it fails one of two ways.

The editor shows the same two messages this table covers. Find yours, apply the fix, and retry detection without re-uploading.

Paper not found

Why it happens
The sheet's edges never resolved. Usually a corner is outside the frame, a corner is under the object, or the paper lies on a surface of nearly the same color.
The fix
Re-shoot with visible air around all four corners and slide something darker under the sheet. Corners & contrast rules

No object found

Why it happens
The paper was located, but nothing on it produced a closed contour. This typically happens with a very light object on white paper, or when reflections break the edge into fragments.
The fix
Increase the object-to-paper contrast, soften the light, or run the AI Zauberstab, which handles low-contrast and reflective parts. Lighting & surface rules

Your next bin is one photo away.

Upload the photo, confirm the outline, and check every millimeter before you export.

No CAD setup · Free during alpha · Export when ready